 Knowledge Base
Getting Started
A step-by-step guide to setting up your venue in Thril, from account creation to pricing, resources, and going live with payments.
Welcome to Thril. This guide walks you through the onboarding steps you'll complete when setting up your venue in the Thril Admin Portal.
✅ 1. Create Your Account
Enter your email address and a strong password (at least 12 characters, including numbers and special characters). Accept the terms and conditions, then click Create account.
Next, enter your first and last name and phone number, then click Continue to Thril.
🏢 2. Company Information
Add your company name, business ID, country, address, and contact details. Thril uses Stripe to manage payouts securely. You will be guided to set up a Stripe account later in the process.
Read more: Stripe
📍 3. Your First Venue
Select whether your venue is a Sports Venue or a Club/Association, then enter the venue name, address, postal code, and city. You can also pin the location on a map. These details are visible to customers, so make sure the name and address are accurate.
🕒 4. Opening Hours
Set your weekly opening hours by entering daily start and end times. If you are closed on a specific weekday, leave that day empty. This ensures customers see accurate availability.
🏟️ 5. Resources and Areas
Add your bookable resources by selecting a sport type (e.g. padel, tennis, gym) and entering the number of courts or spaces. For different sport types or outdoor resources, create a separate resource group. You can always add or edit resources later.
Note: if you are onboarding a club or association, you do not need to add resources or pricing rules. You can skip this step entirely.
💰 6. Pricing
If you are setting up a club or association, you do not need to create pricing rules. You can skip this step entirely. You can also set up pricing later after completing the rest of onboarding.
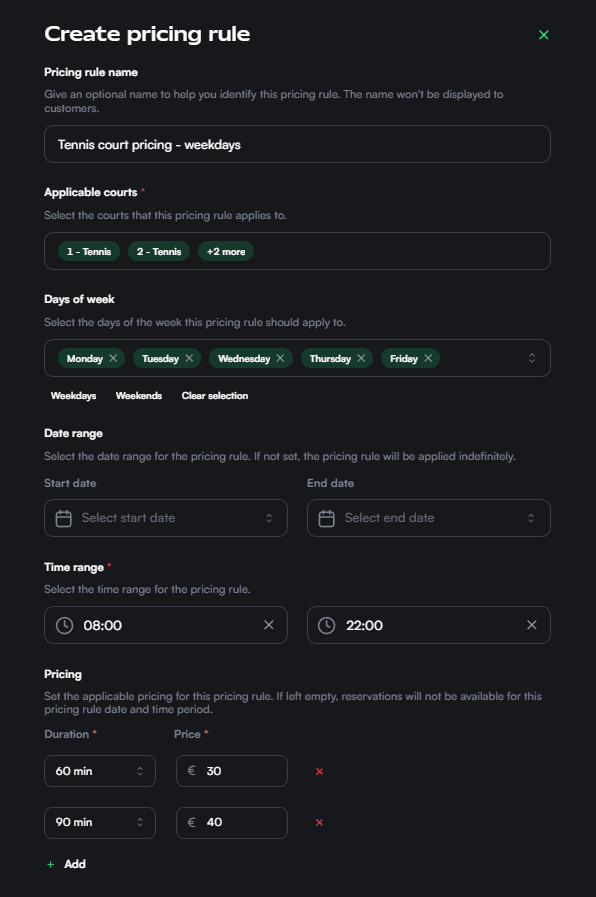
During onboarding, you can create your first rule by clicking the Create pricing rule button.
Follow these steps:
- Click the Create pricing rule button.
- Give the rule a name. This is only visible to admins, not customers. Use something descriptive, like "Tennis weekdays" or "Padel weekends".
- Select the resources this rule applies to. You can choose one or multiple resources.
- Choose the days of the week when the rule is active.
- Set the time window during which the rule applies, for example 08:00–22:00.
- Optionally, set a date range to limit the rule to a specific season, for example summer or winter pricing.
- Add the available booking durations and their prices, for example 60 min / 30€ and 90 min / 40€.
- Save the rule.
Creating separate rules per sport type or resource makes them easier to manage over time. VAT settings are configured separately.
✨ 7. Features
Indicate what additional amenities your venue offers, such as parking, locker rooms, showers, a café, or equipment rental. These details appear on your venue profile.
🧾 Stripe Setup
Before going live, you will be prompted to verify a Stripe account. This is required to receive payments, issue refunds, and manage subscriptions or recurring charges.
🔐 Visibility and Verification
Your venue becomes visible to customers once onboarding is complete, your email is verified, Stripe is connected, and your venue has been reviewed by the Thril team. You will be notified when your venue is live.